Reloading 45-70 shells with Pyrodex
By Paul Heaney
I am lucky enough to be the proud owner of an 1875 Sharps Buchardt rifle chambered for 45-70. I truly love to shoot this classic rifle. I also appreciate the ability to reload ammunition using Pyrodex RS powder and lubricated cast lead bullets providing operation that quite accurately reproduces the rifle’s original performance. I do find that using original style ammunition creates a minor problem with the smoke, dirt and smell but this actually adds to the enjoyment of firing this fine old rifle as it was meant to be used.

The following is the process that I have found to be an effective approach to reloading 45-70 “Black Powder” shells. First let me reiterate that I enjoy the nostalgia of shooting a rifle that is well over a century old. It is kind of like being able to go shooting with my grandfather. I also enjoy the sound, smoke, muzzle blast and recoil followed by a perceptibly delayed snap of the 400 grain bullet hitting the target 100 yards down range.
My freshly fired brass has the minor disadvantage of being both smelly and filled with a quantity of black sludge. (My wife seems to be very tolerant of the strange smells and sounds that drift upstairs from my basement shop after a day of shooting.) The first thing that I do after a firing session is to clean and oil the Sharps. The very next thing that I do is to apply case lubricant to the outside of the spent cases and run them through a sizing/de-capping die from my RCBS set. I do this because compression of the case helps loosen the contamination on the inside of the case. Primer removal opens the primer pocket facilitating dirt removal while also providing drainage for water used in a later step.
 Crud Brushed From Spent Shells
Next I use a soft .45 caliber brush to further loosen and clean out most of the crud that has formed on the inside of the case as the powder burns. This step is followed by six minutes in an ultrasonic soapy-water wash. This dissolves any salts in the powder residue and breaks up any residual solids inside the shell and primer pocket.
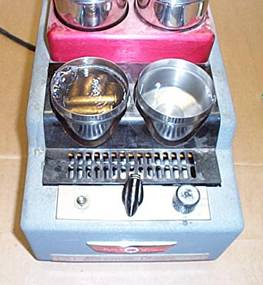 Ultrasonic Cleaner
Cleaned shells are shaken by hand to remove as much of the clinging cleaning solution and contamination as possible prior to a second three-minute ultrasonic rinse in clear water. This second bath removes any residual soap, salt and dirt. Again any remaining water is hand shaken from the shells. Cleaned shells are then laid out to air-dry for at least 24 hours.
The mouth of a shell that has been sized is actually compressed to a slightly smaller diameter than the finished shell specification. The mouth or neck of the shell has to be expanded to a specified diameter to properly grip the bullet that is to be pressed into the finished shell. I use a q-tip coated with die lubricant to lubricate the inside surface of the shell mouth prior to the expansion step. (Sizing and mouth expansion is accomplished in one operation with most reloading tools but not so with resizing shells for reloading lead bullets due to the requirement for flaring the shell mouth, see sidebar.)
SHELL SIZING FOR LEAD BULLETS
The bases of jacketed bullets are designed with enough radius to enter the mouth of a properly sized shell and stretch the case mouth slightly to securely hold the seated bullet. Molds for most cast lead bullets are designed with a sharp edge between the sprue cutter surface and the wall of bullet mold. Locating the sprue on the bullet base is common because shearing the sprue leaves behind a slight surface imperfection that may adversely affect bullet flight. It is logical to make this imperfection on the bullet base where it will have minimal effect on accuracy.
Due to the softness of lead it is usual practice to flair or bell the mouth of shells to be loaded with cast lead bullets. This is done to facilitate the entrance of the bullet into the shell during the seating process while reducing the tendency for scrape lead from the cylindrical surface of the bullet.
It is also common practice to crimp the edge of the shell mouth into the body of the cast lead bullet to help prevent rifle recoil from affecting the seating depth of bullets in shells in a rifle’s magazine.
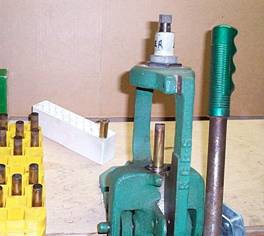 Shell Mouth Expansion/Flair Process
An additional tool is used to expand and flair the shell mouth. The expanding tools for use with lead bullet loading is designed to stretch the mouth of the shell to the proper inside diameter plus flair or bell the mouth of the shell in a single operation. The depth of the expander is adjustable and should be set to provide desired flair when the ram of the loading tool is at the upper limit of its travel. I set the tool to provide flair that is just sufficient to allow the base of the cast and sized bullets to start into the shell without damaging the important surface of the bullet that contacts the rifling. I try to keep the flair as small as possible, avoiding unnecessary stretching and associated work hardening of the edge of the shell mouth. In order to assure flair uniformity I keep my .45-70 brass trimmed to a very tight length tolerance. I do not need to crimp the bullet in the finished cartridge because my Sharps is a single-shot and I do not have to be concerned with having recoil affect bullet location in cartridges in a magazine. (This is not be the case with cartridges for magazine fed rifles where crimping would be advised.)
The next and very important step in case preparation for reloading is inspection:
- I carefully wipe residual lubricant off each case and from the inside of the case mouth with clean cotton cloth.
- I inspect each case under three-power magnification looking for any defect, such as cracks, that would make the case unsafe for reloading.
- I inspect each primer pocket for cleanliness and defects and clean with a pocket brush if necessary.
- I immediately destroy any shell that shows any potentially dangerous defect.
It is important to me that I finish all of the above steps prior to either storing shell cases or starting the reloading process. I maintain this requirement to reduce or eliminate the possibility for errors such as trying to reload cases that have not been flared or inspected. I also make it a practice to NEVER PRIME a case until I am in the reloading process.
My reloading process starts with laying out all of the required items and tools: prepared shell casings, loading blocks, priming tool, primers, powder measure, scale, powder, seating tool, bullets, labels etc.
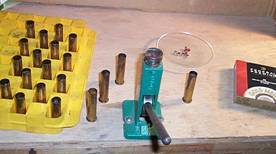 Priming Operation
I prime my shells just prior to reloading using a RCBS priming tool. The type of primer that I use is unimportant as long as it produces consistent accurate results. I use a variety that is commercially available locally and made by a reputable manufacturer. I have tested rounds primed with primers from other well known manufacturers and the same powder charge. Similar accuracy was obtained in each test. It is my conclusion that as long as a specific primer is producing consistent results then it is satisfactory for accurate results. Select a specific primer and stick with it.
By habit I remove each primed shell from the priming tool and touch the seated primer with my little finger as I move the shell to the loading block. This confirms to me that I have successfully seated a primer to the correct depth and that it is not upside down. I also place the shells into the loading block primer side up. When I finish priming a batch I visually scan the shells in the loading block looking for defects. Double checking is always a good practice.
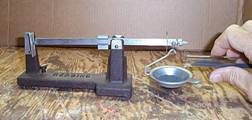
 Dropping Powder into Scale Pan
I do not fill the powder measure until I am ready to fill primed shells. I NEVER put more than one type of powder on my bench while I am loading. I keep the powder measure at least half-full. As a matter of standard practice I keep all powder containers secured and only take one type of powder out of storage when I am ready to use it. I setup and calibrate my scale by checking both zero and a known standard weight.
My manual Redding powder measure is old but still reliable. Pyrodex powder charges from this measure are quite consistent. I also have found that accuracy is dependent on the consistency of the weight of each powder charge. This being the case I weigh each and every powder charge. I set the measure to release a slightly reduced charge and top it off with powder that I dribble into the scale pan from a test-tube. My goal is to control the powder charge to plus/minus 0.1 grains.
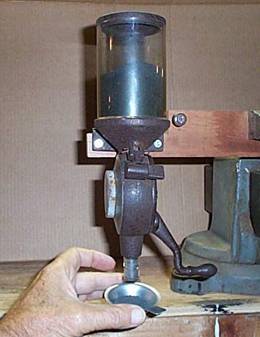
 Adjusting Powder Charge
I start dumping and correcting powder charges in the scale pan. When I obtain a correct powder charge I then take a primed shell from the loading block and, using a funnel, pour the powder into the shell. The mouth side up shell is than returned to the loading block. When all of the shells in the loading block have been filled with powder I visually check the powder level in each shell. Again, this confirms that I have not made an error such as accidentally inverting a shell in the loading block without filling it. I suspect that it is quite embarrassing to end a day of shooting by driving a bullet into the barrel of a classic rifle at a range with a primer and no powder while being watched by a group of fellow shooters. So far I have avoided this experience.
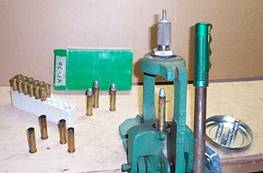 Bullet Seating Operation
Obviously the very next step is to seat bullets into filled shells. I adjust my seating tool to press the bullet just deep enough to allow the finished cartridge to be chambered without interfering with the throat of the rifle barrel. Since I reload for my Sharps using only one type of bullet and I have only one .45-70 rifle, I have the luxury of being able to set and lock the adjustments on the bullet-seating die. I have recorded the overall length of the cartridge that chambers properly in the Sharps. As a result, I only have to check the overall length of the first and last cartridges that I reload at one session. This assures me that nothing has changed during the reloading process.
I place all reloaded cartridges into their associated containers after I finish seating bullets into all of the primed shells that I have filled with powder. I mark each container with the type of cartridge, “.45-70” in this case. I also mark the primer and powder identification plus powder charge in grains. Bullet details are also recorded even though that I use only one type bullet. The overall length of the cartridge is recorded. I also keep track of the number to times that the shells in each batch have been reloaded. I anneal each batch of shell casings after they have been reloaded five times. The annealing technique that I use is to heat the mouth of each shell while it is standing in a water bath that leaves approximately 3/8 inch of the shell above the water surface. Annealing the shell mouth relieves work-hardening of the brass where the shell cases are stretched and compressed the most.